Friday, March 31, 2006

CHOCOLATE CHIP COCONUT MUFFINS

Everyone loves muffins and that's not a secret! Why? Well, because they are fastly prepared, multi-faceted and soooo tasty!

One can create her/his favorite muffins by following a basic recipe and adding the loved ingredient of her/his choice. We feel a bit like (role)playing the scientist or alchemist at home; it wakes up our creative spirit and opens us to new sensations! It is one of those baking products which can be prepared in so many different ways -savory and sweet- as nearly all variations are possible that it is impossible not to love those little wonders!!!

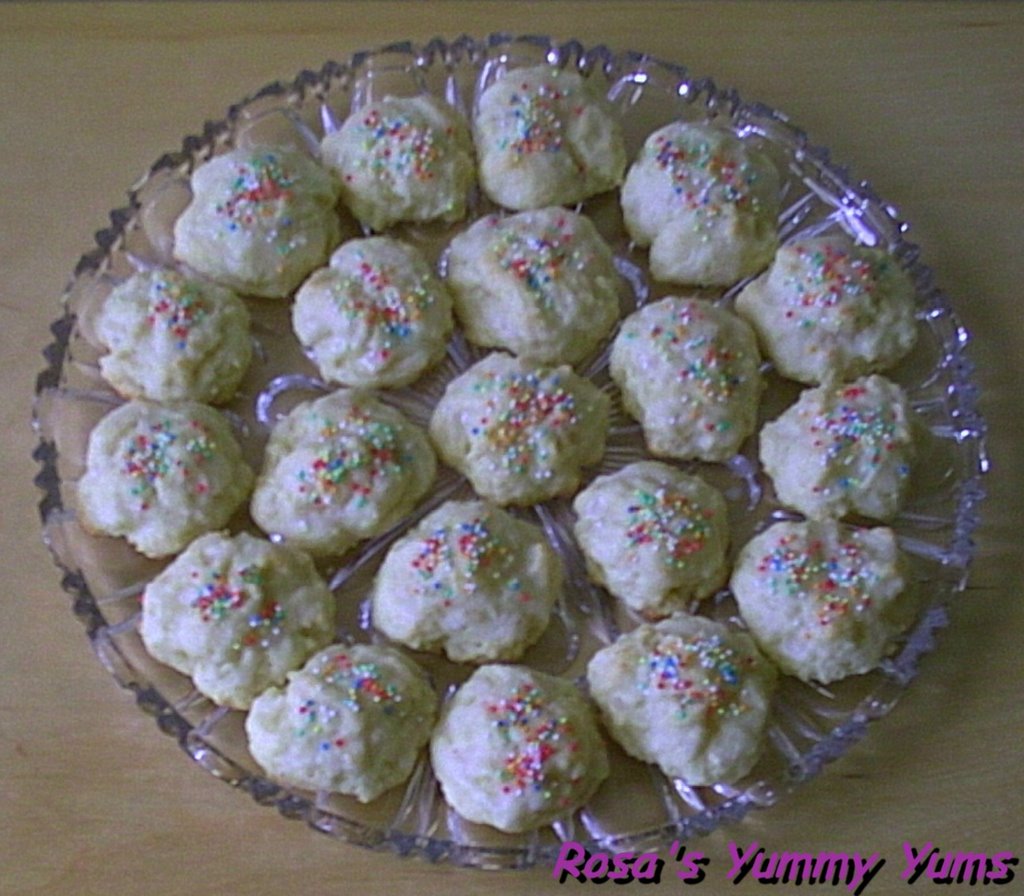
So, I decided that I wanted coconut and chocolate chip muffins and the result was very pleasant ad gratifying! Those muffins were very fluffy and tastful, yummy yum!!!...

This recipe was originally released in the "King Arthur Flour 200th Anniversary Cookbook". I took it from their site (see here) and modified certain detail...

Yields 12 muffins

Ingredients:
300g (2 Cups) Plain white flour
110g (1/2 Cup) Castor sugar
1/2 Tsp Salt
1 Tbs Baking powder
1/2 Cup Grated coconut
1/2-2/3 Cup Chocolate chips
230ml (1 Cup) Milk
62, 5 g (1/4 Cup) Unsalted butter, softened or 62,5ml (1/4 Cup) vegetable oil (optional)
2 Eggs (~50-53g)

Method:
1. Preheat the oven to 250°C (500°F).
2. Blend together the flour, sugar, salt and baking powder.
3. Beat the milk, butter or oil and eggs together until they are light.
4. Pour the wet ingredients into the dry ones.
5. With a fork blend the two for 20 seconds, no more!
6. Fill the cups (2/3-3/4 full) of a greased muffin tin.
7. Place the muffins in the oven and immediately drop the temperature to 200°C (400°F).
8. Bake for 15- 20 minutes or until a skewer comes out clean from the center of a muffin.

Remarks:
If you wish you can reduce the amount of fat or not use any, but remember that it will affect the tenderness and moistness of your muffins; you'll have then to eat them very fastly as they will tend to dry more than the butter/oil version...

The secret of light and tender muffins lies within the blending of the wet ingredients with the dry ones. It's not a problem if you've left some lumps that look as if they want more stirring. Don't continue stirring no matter how hard it is, resist the impulse!

Serving suggestions:
Eat those muffins at any time of the day or for breakfast with butter and jam, honey or peanut butter.
You can also eat them warm.

(Chocolate Chips -Pic by www.acoutica.com)

Thursday, March 30, 2006

PLEASANT HELL

In the center of Geneva, there's a small cute street named "Rue D'enfer" (Hell Street)... Why it's called so, I haven't got the slightest clue, but I can only say that it's a silent cudly little street which in no way reminds me of the sulphuric fires of Satan's realm!!! Everything there is normal, maybe too normal......

Wednesday, March 29, 2006

LAMINGTONS

A few days ago, I wanted to make the highly popular Aussie treat named "Lamingtons", but I did not know which recipe to choose as I have a few different ones underhand... Finally, I decided to make the lamington recipe I made during my highschool time...

This lamington recipe is not as complicated to prepare as the other ones I have in my diverse papers and books, but the end result is also very satisfying!

They are maybe humble little "Lamingtons" and maybe not the luxury version you'd bake for a very special event, but they are nonetheless always very successful and gratifying...

This recipe makes fluffy and moist "Lamingtons" which will rejoice anyone with a passionate love for icing and an addiction to coconut.

It is said that the "Lamingtons" got named after a popular governor of Queensland in Australia (1896-1901), Baron Lamington, but there are a few theories concerning the origin of those cakes...

Ingredients:
125g Unsalted butter
140g Castor sugar
1 Tsp Liquid vanilla
2 Eggs (~50g)
250g Plain white flour
2 Tsp Baking Powder
A pinch salt

125ml Milk
Icing:
300g Icing sugar
3 Tbs Cocoa powder
9-10 Tbs Hot water

160g Grated coconut

Method:
1. Preheat oven to 180°C (350°F).

2. In a bowl, cream the butter, liquid vanilla and sugar together until light and fluffy.
3. Add one egg after another and continuously beat until combined.
4. Stir in the sifted dry ingredients (flour, baking powder and salt) and the milk, alternately.
5. Pour the batter in a greased 27 X 18 cm pan.
6. Bake for about 25-30 minutes or until a thin skewer comes out clean from the thickest part of the cake.
7. Once the cake is cool, cut into squares.

8. Mix the icing sugar with the cocoa.
9. Add, little by little, the hot water and beat until the icing is smooth and liquid.
10. With the help of two forks, dip each piece/square in the icing.
11. Then, toss in the grated coconut.
12. Stand on a wire rack to set.

Remarks:
Don't beat the cake batter!
If you want, you can dip the cake into the cocoa icing the day after it's baking.

Serving suggestions:
To eat without moderation!!!

(Pinnacles -Pic by Tan Yilmaz www.trekearth.com)

Tuesday, March 28, 2006

BIZARRE CLOUDS II

On Sunday morning, that's how I discovered the sky: full of strange clouds...

Lines above the Petit Salève mountain...form eery patterns...and slowly get to look like waves.
On the Jura Mountain side, the clouds look less threatening, but nonetheless bizarre...

Monday, March 27, 2006

APPLE LATKES

"Apple Latkes", a pearl of the Jewish cuisine, are quite similar to the American pancakes we all know. Latkes are always made with grated fruits or vegetables which are added to the basic batter. They exist in different variations and can be enjoyed savory or sweet.

Normally, everybody has heard of potatoe latkes. Well, that's the dessert/sweet version of this highly popular recipe...

Latkes are generally eaten on the night of Hanukkah, the Festival of Lights which is observed somewhere between november and december. It is a traditional holiday dish for all Jewish people. "Latke" is a Yiddish word deriving from the Russian "L'tka" meaning pastry. This word appeared in the English language only in 1927.

Latkes are cooked in memory of the Maccabee (member of an ancient Hebrew family) women who prepared them for the Jewish soldier who were fighting against the Syrians and since latkes are fried in oil, they also symbolize the burning oil which miraculously lasted eight days in the candelabrum (menorah).


"Apple Latkes" are very fine, light textured and delicately perfumed with the aromas of the apples used. If you love pancakes, then they are undeniably irresistible!

This recipe was printed in Joan Nathan's "Jewish Holiday Cookbook" and was adapted by myself...

Ingredients:
2 Eggs, well beaten
1 1/2 Cups Orange juice, yoghurt or milk (I used part orange juice part yoghurt)
300g (2 Cups) Plain white flour
1 Tsp Baking powder
A pinch of salt
55g-110g (1/4-1/2 Cup) Castor sugar, depending on taste
3 Medium sour apples (boskoop), peeled and coarsly grated
Vegetable (peanut) oil for frying
Powder sugar

Method:
1. In a bowl, mix the eggs with the orange juice, yoghurt or milk.
2. In a bigger bowl, combine the flour, baking powder, salt and sugar.
3. Slowly add the egg mixture to the dry ingredients while continuesly beating.
4. Add the grated apples and mix well.
5. Heat either a skillet or a frying pan with a little oil.

6. Drop one large tablespoon mixture into the hot oil.
7. Cook for about 2 minutes on each side until slightly golden.

8. Drain on kitchen paper.
9. Serve straight away or keep warm.

Remarks:
I used orange juice and yoghurt for this recipe.
Like with pancakes, you can transfer the latkes to a heatproof plate, cover it with a cloth/foil and keep warm.

Serving suggestions:
Serve the latkes sprikled with powder sugar, maple syrup, lihght brown sugar, creamed butter or ground cinnamon. Latkes are perfect when eaten for breakfast or as main dish dinner/supper).

(Menorah -Pic by www.rsvpstationers.com)

Saturday, March 25, 2006

WEEKEND CAT BLOGGING #42

Our favorite weekly WCB round-up is back!

This week, as guest star, please welcome the terrible Fridolin or "Inspektor" (inspector) who is like an uncontrollable jumping pea! He's really a freaky little dude who can never calm down and always has to do something that will drive us bananas!!! We nickname him "Inspektor", because he can't stop smelling everything, stuffing his wet little nose everywhere and searching for smell trails...

You will also find this picture as well as others on the great Eat Stuff blog from Sydney, Australia where you can discover Kiri's new pictures... If you also want to participate to Weekend Cat Blogging, then just leave your blog name, URL and permalink in a comment on Clare and Casey's site.

Friday, March 24, 2006

FIRST CUMULUS CLOUDS

Yesterday, after the rain, we were lucky enough to enjoy a beautiful panorama (you can see the Jura mountain still covered with snow) and thrilling cumulus clouds... I really love the scenic view we have from our apartment!

Thursday, March 23, 2006

BAGUETTE PARISIENNE OR FRENCH STICK

"Baguette Parisienne" is really a bread I love, but only when it's homemade as nothing compares to a super tasty, hyper crusty and beautifully smooth bread like this one. Those I've bought in stores or in bakeries were never as enjoyable as the "Baguettes Parisiennes" of my book, because I tend to find them dry, too airy and lacking taste (in my opinion)...

I've made this bread a few times and was always very satisfied with the results of my work. Of course, the quality of the recipe has a lot to do with the end product as Eric Treuille and Ursula Ferrigno's "Baguette Parisienne" is simply perfect and heavenly! With their "Ultimate Bread" book nothing can go wrong!!!

Although it takes a certain time to prepare (3 hours of rising), I hope you'll find this "Baguette Parisienne" recipe as interesting as me...

Yields 3 loaves

Ingredients:
2 1/2 Tsp Dried yeast
375ml Water, lukewarm
500g Plain white flour
1 1/2 Tsp Salt

Method:
1. Sprinkle the yeast into 300ml of the water in a bowl.
2. Leave for 5 minutes and then stir to dissolve.
3. Mix the flour and salt in a large bowl and make a well in the centre.
4. Pour in the yeasted water and with the help of a wooden spoon, draw enough of the flour into the yeasted water in order to form a soft paste.
5. Cover the bowl with a tea towel and leave to "sponge" until frothy and risen, about 20 minutes.

6. Mix in the flour and add the remaining water.

7. Turn out on to a lightly floured surface and knead until soft, supple and smooth, about 10 minutes.
8. Put the dough into a clean bowl, cover with a tea towel and leave to rise until doubled in size, about 1 1/2 hours.
9. Knock back, re-cover and leave to rise for a further 45 minutes.
10. Knock back again, re-cover and leave to rise until doubled in size, about 45 minutes.
11. Divide the dough into three equal-sized pieces and shape into two 30cm long baguettes *(see explanations).
12. Place on a floured baking sheet or baguette tray and cover with a tea towel.
13. Prove until doubled in size, about 50 minutes.
14. Cut several diagonal slashes across the top.

15. Bake in the preheated oven (240°C/475°F) for 20-25 minutes until golden and hollow-sounding when tapped underneath.
16. Cool on a wire rack.

Remarks:
The dough should be soft and sticky, so avoid adding extra flour while kneading.

Serving suggestions:
Eat baguette when you want; it's just heavenly at any time of the day!
With a "Baguette Parisienne", you can make bruschette or garlic bread and, of course, your sandwiches will be awsome with this bread!

* Shaping the baguette:
Flatten the dough with the lightly floured palm of your hand to expel any gas bubbles. Keep the dough in a round shape. Take one end of the dough and fold it into the centre. Press gently to seal the fold. Fold the other half of the dough into the centre, so that the two folds overlap along the middle of the loaf. Gently press along the length of the outer seam, using the palm of your hand to seal the two folds together. Use the thumbs of both hands to create an indentation in the centre of the dough. Before bringing the top half before you, rest your fingertips along the top of the dough and give a firm, short push forwards. Gently press down with the palm of your hand along the seam to seal the fold. Place the dough seam-side down. Press with the palm of both hands and roll the dough backwards and forwards while moving both hands outwards along the loaf to achieve the desired length and shape.

(Bakery In Paris -Pic by http://www-rocq.inria.fr/~gouet/)
(Baguette -Pic by http://dahlin.typepad.com)

TYRANOSAURUS MAXIMUS

Who's the tyrant now, the master or the demonically cute fluff ball?!?...

Wednesday, March 22, 2006

BIZARRE CLOUDS

A crow flying in a very strange sky pattern...

SWEET PLANTAINS

Plantains (platanos/musa paradisiaca) bananas or "cooking bananas", "green bananas" or "potatoes of the air" are very versatile fruits which can be used in savory or sweet dishes. Generally, plantains are eaten cooked rather than raw, but it is nonetheless possible to consume them raw when they are extremely ripe.

A green plantain is very firm, starchy and has a green skin. It should be cooked and prepared in the same manner as potatoes. When the skin is yellow and the flesh is still firm, the plantain is a little sweeter, but still very starchy. It's only when the plantain's skin is blackish brown and the fruit very ripe, yellow and soft that this banana is ready and sweet enough to be used in the preparation of desserts. It's sweetness is due to the fact that during the ripening process a plantain's starch transforms itself into sugar...

Plantains are rich in carbohydrates and potassium. They are normally eaten as a starchy staple nutrient and very much like potatoes they can be served fried, steamed, boiled, mashed, stewed, baked and grilled. In certain places, they are even fermented to make a kind of alcohol.

They are a major food crop in developping countries and can be found in many different places. But, although plantains are widely used and grown in tropical Africa, the Caribbean, Central and in South America as well as in other tropical regions of the world, they are native of the Southeast Asia and the nearby islands (India, Indonesia and Malaysia till Australia). There are many possible explainations to how they arrived in Africa: either they were brought by the Malay-Polynesian people who settled in Madagascar, either by the Arab traders or the Indian traders who settled on the East-African coast. They also surely got exported by the Spanish and Portuguese
conquistadors who colonized the Americas...

Serves 2


-Various stages of ripeness: very ripe, semi-ripe, green.-
Ingredients:
2 Very ripe plantains, peeled and cut in slices
2 Oranges, pressed
8 Tsp Light runny honey
4 Tsp Brown rum
2/3 Tsp Ground cinnamon

Method:
1. In a baking dish, arrange the plantain slices.
2. In a small bowl, mix together the rest of the ingredients.
3. Pour over the plantain slices.
4. Bake at 180°C (350°) for 30-35 minutes until the slices look well caramelized.
5. Let cool or serve warm.

Remarks:
Ripe plantains have a black skin. If your plantain is still green or yellow, you'll have to wait.
While baking the plantains, don't be afraid to regularly wet the plantain slices with the juice in which they are cooking.

Serving suggestions:
Eat while still warm or at room temperature with some whipped cream (if desired). You can also sprinkle them with grated coconut if you want a more "exotic" touch...

(Plantains -Pic by http://elissa.typepad.com)
(Isla Ometepe -Pic ba Peter Sch www.trekearth.com)

Tuesday, March 21, 2006

ANOTHER SIGN OF SPRING

Another sign of Spring that my boyfriend kindly brought back home...

Monday, March 20, 2006

CRYSTAL CLEAR SUNSETS

A week ago, on Sunday evening: it was terribly cold and a strong northwind was blowing, therefore the sky was so crystal clear...

The sun is gently going down behing the Jura mountains...A few minutes later, only a weak light remains...On the other side, the moon is starting to show up above the Salève...

Saturday, March 18, 2006

WEEKEND CAT BLOGGING #41

Yippee, here's another WCB round-up and like every week, I'm happy to discover which cute little pussy cats are going to be featured!!!

Last Sunday, Fridolin and Maruschka looking very thoughtful in front of their drinking bowl... I bet that they are wondering when the supper will be served!!!
In fact, we have observed that on Sundays, our cats have different habits (like us I suppose) and behave quite differently than during the week... Generally, they are calmer, but are crying earlier for food which is really annoying as we can't relax or eat our Sunday confectionery in peace!!!

You will also find this picture as well as others on the great Eat Stuff blog from Sydney, Australia where you can discover Kiri's new pictures... If you also want to participate to Weekend Cat Blogging, then just leave your blog name, URL and permalink in a comment on Clare and Casey's site.

Friday, March 17, 2006

TRAVELLING TO PARMA...

Here's a good joke full of bad taste!!!

"The trader has said that they are embarking on a unique and golden autumn trip to Italy, the historical ham city of Parma..."

(Parma Pigs -Pic by MarĂĽnde www.wolf-ruediger-marunde.de)

ODE TO SPRING

Last Sunday morning while walking in my village, I saw loads of beautiful snowdrops entirely covering the grass of a garden...
Isn't that awsome?!

Thursday, March 16, 2006

BANANA KETCHUP

I had a few bananas that I needed to use and since I'm very much fond of guava ketchup (see review), I wanted to try making my own unusual ketchup...

This recipe is absolutely delicious and can threaten any industrial Ketchup found in stores.

The aroma of banana is not overpowerful and blends perfectly with the spices. It is a type of ketchup which is very round tasting, spicy and well-balanced.
You will see that it will become your faithful ally, especially since everybody will love it, your kids included. Another positive aspect of making your own Ketchup is that you can control the quality of the ingredients used and you know what's in it...

This "Banana Ketchup" is very healthy and fabulously ketchuppy!!! Try it now!

This recipe was originally printed in the "San Fransisco Chronicle". As it is my habit, I have changed a few details...

Ingedients:
50g Golden raisins
1 Medium onion, chopped
2 Cloves garlic, crushed
90g Tomato puree/paste
160ml White vinegar
2 Ripe bananas, peeled and cut into chunks
360-480ml Water
70g Light brown sugar
2-3 Tsp salt (or more depending on your taste)
1/4 Tsp Ground cayenne pepper
1 Tsp Ground allspice
1/2 Tsp Ground cinnamon
1/3 Tsp Ground nutmeg
1/4 Ground black pepper
1/5 Tsp Ground cloves
4 1/2 Tbs Light corn syrup or light runny honey (or a mixture of both)
1 Tbs Dark rum

Method:
1. Combine the raisins, onion, garlic, tomato puree and 50ml vinegar in the container of a food processor and process until smooth.
2. Transfer the mixture into a large saucepan.
3. Add the banana chunks and another 50ml vinegar to the food processor and process until smooth.
4. Transfer the banana mixture to the processed puree mixture in the saucepan.
5. Add the remaining 60ml vinegar, 360ml water, sugar, salt and cayenne pepper.
6. Bring the mixture to the boil over medium-high heat, stirring frequently.
7. Reduce the heat to the lowest point and let the ketchup simmer, uncovered while stirring continuesly for about 1 1/4 hours.
8. Add the allspice, cinnamon, nutmeg, pepper, cloves and corn syrup/honey.
9. Cook the mixture over medium-high heat, stirring frequently for about 15 minutes or until it is thick enough to coat a metal spoon.

10. Stir in the rum.
11. Remove the ketchup from the heat and let it cool a few minutes.
12. Force the ketchup through a fine sieve to strain it, pressing down hard on the solids which might remain or process it.
13. Let cool at room temperature.

Remarks:
If while simmering, the mixture tends to stick to the bottom of the saucepan, then add some more water.
Never let the mixture burn, therefore you should always be there to control it while it's cooking, a bit like jam...
You can store this ketchup in a bottle in the refrigerator for a few months.

Seving suggestions:
Eat it like you would do with tomato ketchup or use it in sauces, salad dressings and marinades. I also use it as a dip for tortilla crisps...

(Ketchup Bottle -Pic by www.sotofineart.com)
(Bananas -Pic by
http://fusionanomaly.net)

Wednesday, March 15, 2006

THE MOON

The moon, a few days before fullmoon...

Tuesday, March 14, 2006

SPRING SNOW

Early in the morning...
...the village is still covered with snow.

Monday, March 13, 2006

ITALIAN RICOTTA COOKIES

I had never used ricotta cheese in cookies before and would not have thought about using this cheese in this way, but I was very satisfied by my discovery...

Those Italian-style "Ricotta Cookies" are very different to the American or English ones we know as they are very soft and moist. The ricotta gives them a smooth and fluffy texture that could be described as heavenly! Their taste is delicat and original; aromas of nutmeg and lemon are seldom mixed together, although they blend perfectly. And the frosting confers them an added tinge of lemon that is not unpleasant at all...

Their yummiliciousness is just not comparableto any cookie I have eaten so far. Those cookies are unique little jewels that are packed with aromas waiting to explode like firewoks in your mouth. "Ricotta Cookies" are fresh and spicy, light and dreamlike... I call them "angel cookies"!

Believe me, those pretty and delicious little cookies will be a hit with everyone!!!


The recipe was taken from www.cookingvillage.com and rearranged by myself after having googled around the net...

Ingredients:

125g (1/2 Cup) Unsalted butter
220g (1 Cup) Castor sugar

1 Lemon, zested and pressed
1 Egg (~50g), beaten
250g (1/2 lb) Ricotta cheese

300g (2 Cups) Plain white flour
1 Tsp Baking powder
3/4 Tsp Baking soda

1/4 Tsp Ground nutmeg
A pinch of salt

Frosting:
240g (1 1/2 Cup) Powder sugar (icing or confectioner's sugar)
3 Tbs Milk (and more if needed)
A few drops of lemon extract
Coloured candy sprinkles


Method:
1. Preheat the oven to 180°C (350°F).
2. Mix the flour, baking soda, baking powder, nutmeg and salt together.
3. Cream the butter and sugar together.
4. Add the lemon zest and juice, mix well with the help of a whisk.
5. Add the egg and beat well again.
6. Add the ricotta cheeese and beat until well blended, about 1 minute.

7. Slowly incorporate the dry ingredients, mixing only until blended.
8. Drop rounded teaspoonsful on a paper baking sheet.
9. Bake for 12-14 minutes in the middle of the oven.

10. Cool on wire rack.
11. Mix together the powder sugar, milk and lemon extract in order to obtain a brushable frosting.
12. Brush each cookie with the mixture and top with the colour candy sprinkles.
13. Leave the cookies on a wire rack until the frosting has set.

Remarks:
The ricotta cookies should be pale white and golden underneath, so don't overbake them!
Instead of brushing them with frosting, you can just simply sprinkle the cookies with powder sugar.

Serving suggestions:
Those cookies are absolutely perfect when eaten with a good cup
of coffee or tea.

(Ricotta -Pic by www.cmlarioorientale.it)

SWISS PANORAMAS

If you are interested in seeing stunning panoramic views of Switzerland and travelling a little in your head, then I recommend you to have a look at the official Swiss Tourism site (see link).

Their panoramas are absolutely gorgeous as they are taken from up above in the mountains!...

The Wildstrubel in the Berner Oberalp...

(Wilstrubel -Pic by Florin Calin www.trekearth.com)

Saturday, March 11, 2006

WEEKEND CAT BLOGGING #40

Are you ready for another weekend of cat blogging? Well boy, I am definitely!!! I just simply can't wait to see all those pretty kitties...

This week, our cuddly and soft Maruschka wants to show you her pretty belly! In fact, her favorite way of lying is on the back like a "rolled ham"!!! We like to nickname her "Schweinlein" which means "piggy" in German. Maybe you can understand why, he, he!... I love her funny face expression and her funny body positions. In my opinion, this photo depicts our unique clownesque pussycat very well! Isn't she cute?...

You will also find this picture as well as others on the great Eat Stuff blog from Sydney, Australia where you can discover Kiri's new pictures... If you also want to participate to Weekend Cat Blogging, then just leave your blog name, URL and permalink in a comment on Clare and Casey's site.

More cute kitties:
Check out Tauri the little good luck calico at The Westering Hills
Check out the new kittens on the block, and be introduced to them individualy (Yes they have names!) at Anne’s Food
Check out Rima, the poor kitty has a nasty toothache, we hope it gets better soon at Les Carnets de sbmarie
Check out Marushka, she’s showin us what a nice kitty she is at Rosa’s Yummy Yums
Check out Salsa she is getting spruced up so you will play with her at Papilles et Pupilles
Check out the new adorbleness that wandered into Boos house at Mask Masak *IF YOU LIVE IN KL PLS HELP BOO BY ADOPTING A STRAY!*
Check out
Lucky and see how sexy a spruced up kitty can look at These days in French Life
Check out Teca another waaaaay cute loving Burmese at Aliment
Check out Kamikaze and see what internet record he is going for at I got two shoes
Find out what all the hip
kitties are doing in there spare time at A few of my favourite Things
Check out a great profile shot of Callie at Sweetnicks Place
Check out the very cute new kitten on the block at Marcia ‘Tack
Check out Baliey and see how fleeting life at the top can be at The Moveable Feast Food Blog
Find out how the new kitty earned her place in the pride at Restaurant Widow
Check out Milly as she contemplates wether Kitty energy expenditure is worth the effort… at A Pretty How Town
Check out the WCB post written by Kashim and Othello at Paulchens FoodBlog
Check out Le Petite Tigre who knows whos chair it really is, HIS! and just you try and take it away at Lali et Cie
Check out Aggie peaking out, I think she is hiding, as she has finally leant how to “work it” or them(LOL) at Kayak Soup
Check out Booski-diddle enjoy kitty perks at See, Sip, Taste, Hear
Check out Ayla and Le Chat who are helping mum with her new camera at Heather’s Space
Check out Maple, there is nothing like some snow to give a kitty perspective at Middle-Fork
Check out Bussi, but don’t be hypnotised by his big green eyes at Basic Juice
Check out Upsie on garden patrol at What did you eat
Check out Rufus, the bobcat relaxing on the bbq (uhuh) at My Bountiful Diary
Check out Pooks and Fang holding paws at Occasionally Christine
Check out Max attacking the camera, it looks more like a huge smooch to me at Passionate Nonchlance
Check out Whiskey and Bojangles admiring the view from the first open window and drool overbraised phesant at Just Braise

Friday, March 10, 2006

ROSE

Nature's beauty warms up our hearts...

Thursday, March 9, 2006

SUNSETS

Sunset with trails...
Pink dreamscape...Lined sunset...